

Finger Joints Woodwork: Cutting and Fitting in Plywood
Posted: November 3, 2026
Three numbers decide whether the box goes together. Finger width, slot depth, and kerf. I take all three from the sheet on the bench, not from the stamp on the bundle.
I have cut an 18 mm joint for plywood that measured 17.2. The pins stood proud, or the faces split, depending on which way I was wrong. You find that out at assembly, which is late.
The joint
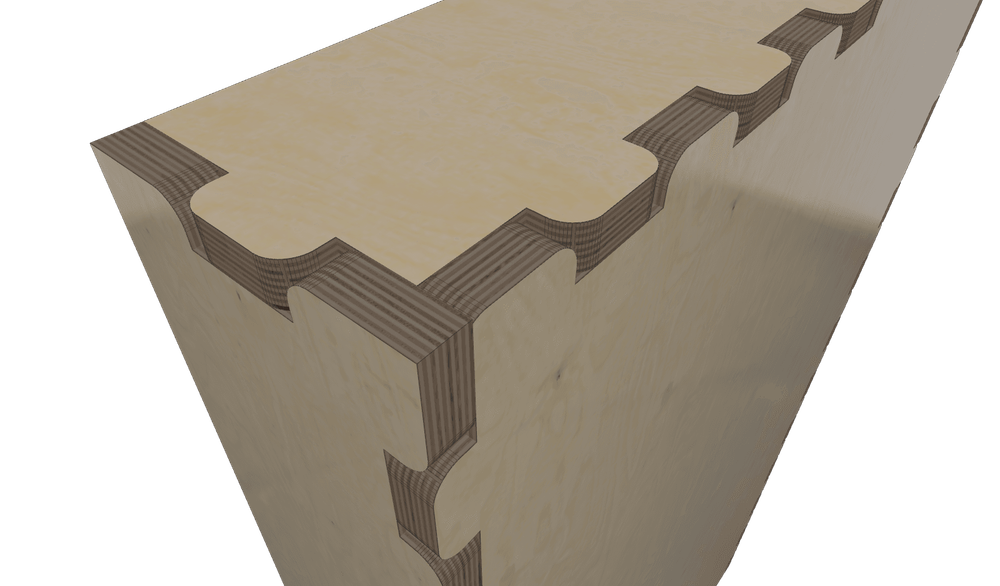
A finger joint is the row of rectangular tabs where two panels meet. Box corners, a carcass, a shelf, an organizer. More glue than a butt joint, and the whole joint can live in the cut file. That is why it suits a laser or a CNC.
Shops also use the name for the cutterhead joint that turns two short boards into one long one. This is the corner, not that.
A dado is another setup, and it does not lock the corner. A miter has almost no glue and wants tape or a fastener. Fingers are the corner.
Width, count, and depth
Measure the sheet before you pick a width. Nominal 18 mm Baltic birch is a label. The calipers have told me 17.2. The next sheet may not match. Design to the number you just measured, and cut the mating parts from that same sheet.
Finger width. On 3 mm to 6 mm stock I keep the finger near the thickness. Under about half the thickness they snap, and there is nothing left for glue. On 3/4 in or 18 mm ply I use something from about 3/4 in up to 1-1/4 in. Wide enough to look right, wide enough to bridge a core void. The proportions I actually use are in how fingers work.
The bit gets a vote. A slot cannot be narrower than the cutter. A 1/8 in bit can cut a 1/4 in finger. It cannot cut one thinner than itself.
An odd count, and no leftover sliver. Divide the edge into an odd number of equal parts, then alternate finger and slot. Odd is what puts a finger on both ends, so the corner does not finish on a half-notch. The mating edge is the complement. It starts and ends on a slot.
Fingers and slots are the same width, so a nice round finger almost never divides the panel. Seventeen steps of 18 mm is 306 mm. Fifteen is 270 mm. A 300 mm panel is 6 mm over one of those and 30 mm under the other. Keep the 18 mm finger anyway and the remainder becomes a short finger on the end. It breaks off.
Let the finger width move. 300 mm split into 17 equal parts is about 17.6 mm, nine fingers and eight slots. Split into 15, it is 20 mm even, eight fingers and seven slots. I use the 20 mm on plywood. Wider finger, same layout, and it bridges a void that 17.6 mm might sit in. A few tenths of a millimeter disappears on a CNC. On a table saw you will see it, so set the dado to the width you actually computed.
Depth is the other thickness. People mix these up and then blame the kerf.
Slot width is the rattling direction. The slot has to fit the plywood thickness, plus whatever gap or interference you chose on purpose.
Slot depth is the flush direction. For a through joint, depth equals the thickness of the piece that shows on the outside. Short, and the pin stands proud. Long, and you blow through the face.
One measured thickness. Use it for both. A blind corner, with the end grain hidden, is a rabbet or a stopped joint. It is not a finger you cut a little shallow.
Three ways to cut them
| Method | Setup | Change a size | Where it earns its keep |
|---|---|---|---|
| Table saw, dado stack | High | A new setup | A run of the same joint |
| Router and a jig | Medium | A new jig | Stock wider than the dado, odd thickness |
| CNC or laser | The file | Re-export | Sheet goods, and the next size |
Table saw. Dado width equals the finger width. Stack height equals the measured thickness. A miter-gauge jig with an index pin walks the board across. Cut the mating board from the same setup, started on a slot so the fingers interlock. Both boards, one setup. A 6 mm box and an 18 mm box are two setups. I use this when I have a pile of identical joints in solid stock or thick ply, and the next one is the same size.
Router. A straight bit in the router table, and a spacing jig, when the panel is wider than the dado stack will reach. The bit width is the finger width. Take light passes. Measure the sheet before you set the height. Plywood moves more than the label admits.
CNC or laser. The machine cuts the slots from the file, so a new width is a new export. Kerf and bit diameter still have to be honest, which is where most box generators get thin. On a CNC the bit is round. A square finger stops on that radius and sits proud of the face. Corner relief lets it seat. A laser does not need that. The beam is the kerf.
Boxes.py will generate a laser-cut box, and a lot of people stop there. Kerf is one number. MakerCase is the fast path for a plain finger box. PanelOrca lays the parts on a sheet. Fusion will do the joint if you are willing to draw it.
GCrafter is where I change the size without redrawing the fingers. Thickness, finger width, and a separate kerf for X and for Y, then export. Sheet-goods joinery. A sculpted chair back still belongs in Fusion. Finger count will not save a shelf that spans too far. That judgment stays yours.
Plywood is not maple
A fit I trusted on maple has failed on birch ply for three reasons. The thickness wanders, the core has holes, and the face veneer is thin.
Thickness. A slot drawn at 18 mm is loose on a 17.2 sheet and scraping the finish on the next one. Calipers, then cut the fingers and the slots from the same sheet when you can.
Voids. Cheaper 18 mm has gaps in the core where the inner plies never met. A finger edge lands on air. Half the glue surface is missing, what is left is the face veneer, and the joint hinges instead of locking. Maple has no interior to do that to you.
Keep the fingers wide enough to bridge a gap. A 1/4 in finger on 3/4 stock can sit entirely in a void. A 3/4 in finger usually catches solid ply on either side. If you can see a void on the edge of the sheet, do not park a finger on it. Glue the face plies. Do not count on the core. When the corner matters, pay for Baltic birch.
Tear-out. The face veneer splinters when the cutter exits. There is no solid grain under it to hold the chip. On a CNC, leave a light climb pass for the last trip through the slot, and use a sharp bit. On the table saw, back up the exit. A sacrificial fence or a backer board. The two end fingers are the ones that show.
Kerf
The beam or the bit removes a strip of material. A slot comes out wider than the line you drew. A finger comes out narrower. Compensate so the part that is left matches the drawing. If you widen the drawn slot and also let the beam widen it, the joint rattles.
On a CO2 laser in Baltic birch, 0.15 mm to 0.25 mm is a normal range. It is a sanity check, not your number. If the calipers say 1 mm, measure again before you blame the file.
Cut a square of a size you know, in the material you will cut, at the power and speed you will use. Measure both directions. Programmed size minus measured size is the kerf. Half of that is the offset on each edge. A 100 mm square that measures 99.8 mm is 0.2 mm of kerf, 0.1 mm a side. Do it again for 3 mm and for 6 mm. They do not match, even on the same job.
X and Y often differ. Belt tension, a tired mirror, a lens that is not symmetric. A slot can be tight across the grain and loose along it. Measure both. One kerf value is a compromise, which is why a Boxes.py file still needs a tweak when the two axes do not agree.
One coupon, then the sheet
One scrap from the same sheet. One finger and one slot, labeled for X and for Y. Ten minutes.
Pick the fit before you cut.
A press fit is thumb pressure, no sanding, no clamps. On a laser that is a small interference, on the order of a few hundredths of a millimeter. Any error in the kerf number eats it.
A glue-gap fit leaves a hair of clearance so PVA has somewhere to go and the clamp closes the joint. For plywood I use this. Thickness moves across a cheap sheet. A press fit sized on the thin spot splits the face on the thick spot.
If the coupon needs sanding, that axis is tight. Open the offset a little and cut another coupon. Do not tune it on a full sheet.
If every slot is tight, the kerf number is wrong. If one slot is tight, that feature is wrong. Look at the offset before you reach for sandpaper.
If it rattles, do not sand the fingers. Sanding removes the material you are already short of. A hair of looseness can close with glue and a clamp. A real rattle wants a smaller offset and a new coupon.
When it fails
Loose after the glue. The offset ran one way, or you compensated the laser and ignored bit deflection on the CNC. Per-axis kerf, then the three-finger coupon, before a full sheet.
Burned edges. Slow and underpowered on thick ply scorches the finger faces. Glue sticks to soot. Run speed and power on scrap from the same batch. Masking tape keeps the smoke off the face. It does not clean the edge you are gluing. Sand that.
A void on the glue face. The finger landed in a gap. Move the fingers onto solid veneer, widen them, or buy a better sheet for that box.
It will not square. A tab that does not match its slot, or a depth that is short on one corner. Dry-fit the whole thing. Clamp it to a corner you know is square. Check the diagonals. Then glue.
FAQ
What finger width for 18 mm plywood?
Measure the sheet first. On Baltic birch that is actually near 18 mm, I use about 3/4 in to 1-1/4 in. Stay above half the thickness, so nothing under about 9 mm. Narrower than that gets fragile, and a 1/4 in finger can land entirely in a core void.
How much kerf for 3 mm Baltic birch on a laser?
Start from the idea that a CO2 laser in birch is often 0.15 mm to 0.25 mm, then throw that away if your calipers disagree. Cut a square, measure it, subtract from the programmed size, and use half the difference on each edge. Measure X and Y separately. 3 mm and 6 mm on the same machine are two tests.
Can I cut plywood fingers without a dado stack?
Yes. A straight bit and a spacing jig on the router table when the panel is wide or the thickness is odd. A CNC or a laser cuts the joint from the file, and the next size is an export. The dado stack wins when you have a run of identical joints and you do not want to think about the one after that.
Tight on one axis, loose on the other.
The beam is not square. Belt, mirror, or lens, and the footprint in X is not the footprint in Y. Measure each axis. Cut a labeled coupon, one finger pair each way, and change the offset for the axis that fought you.
Should the fingers go all the way through?
For a through joint, yes. Slot depth equals the measured thickness of the piece on the outside. Shallow leaves the pin proud. Deep breaks the face veneer. End on a finger, so you are not leaving a slot wall as the edge of the panel. That edge is where the veneer tears out.
Happy making.
Andy